Search This Blog

Sunday, September 23, 2012

Be Inspired By Fall


Fall is here officially, and before we head into the holiday season later this year, we have some great time to just enjoy all that Fall. Don't forget one of the big events of Fall....the Scrappin' Happily Ever After Fall Yard Sale!  The yard sale will be on Saturday, October 13th, and you will want to be there early to get the good stuff!!!  Ivy has updated the calendar here on the blog with all the information on the yard sale consignment dates and times.  Start gathering, labeling, and pricing your items now.

Okay...so back to Fall and all the changes Fall brings...cooler temperatures, changing colors on the leaves, and soon we will see the pumpkin patches and corn mazes open.  Fall in South Carolina is one of my favorite times of year. I am hoping to use some of my wonderful paper and crafting supplies from Scrappin' Happily Ever After to make great seasonal home decor items this Fall.  Ivy has stocked some great fall lines including the new Simple Stories lines: Harvest Lane and Take a Hike.  There are too many great Halloween lines and papers to list, and they would be great for many of Fall and Halloween home decor projects.  

I thought I would check out Pinterest to see what was out there for inspiration.  Of course, I found way too much inspiration, but thought I would share a few items with you all to get your creative juices percolating.  

There were some great Fall wreaths that could be made with paper.


I love this paper pumpkin!  It would be super cute using some of the Halloween Paper Lines or the Harvest Lane paper line at S.H.E.A.

Who doesn't love owls?


Framed art 

The idea of framed art inspired me, and I just may have to try this, only I thought it might be cute to have a framed piece with several small pumpkins and/or leaves all cut out of different patterned papers and organized in rows. 

Some of these projects could be made quite easily with the Silhoutte or Cricut, or using punches and templates.  Check out the great Fall and Halloween lines at Scrappin' Happily Ever After and get crafting for Fall! Also, don't limit yourself to paper lines specifically for the season.  Consider the colors you want to include, check out the backsides of some of the other paper lines, and you might find the perfect paper to compliment your project.

What Fall or Halloween crafting projects do you have on your to do list? 

Wednesday, September 19, 2012

What's New?


There is so much new product at Scrappin' Happily Ever After these days!  Boxes are coming in all the time, and you will find many new Fall and Holiday lines and embellishments around the store. Ivy has been busy unpacking and stocking up on great paper lines and embellishments related to Back to School, Fall, Halloween, Thanksgiving, and Christmas, as well as some great general lines too!  

BUT WAIT!  Before you add new products to your stash....don't forget the YARD SALE is coming soon!!!

The S.H.E.A Fall Yard Sale is right around the corner, on Saturday, October 13th.  That is only three weeks away.  This is the perfect time to go through your paper, embellishments, tools, storage, and supplies.  Selling items in the yard sale is a win-win for you.  You decrease what you have that you are not using, and earn store credit to buy all the new products!!!  Ivy will be sending out an email soon with more details on the Yard Sale, so keep an eye out for it.

So what will you do with all your yard sale earnings???  Here is a sneak peek of some of the new lines coming in.  Which one is your favorite?

BACK TO SCHOOL....

Little Yellow Bicycle: Makin' the Grade is a wonderful line that gets an A+ for style, cute patterns, and embellishments.  Whether you have first day of school pics, memorabilia from previous years, or school pictures, this paper line is perfect to capture those school memories.

FALL IS IN THE AIR....

Simple Stories: Take a Hike.  This line has great colors and would fit with any outdoorsy theme you might need to craft from camping, to sight seeing, to picnics, or even being outdoor in the back yard! Like all Simple Stories lines, this one has some great neutral patterns in bright colors like oranges, greens, yellows, and browns that would be perfect for any type of project you are working on.


Simple Stories: Harvest Lane.  Just like we love the changing colors of the leaves, you will love the vibrant colors of Fall represented here in this paper.  Don't be fooled by the name of this line though.  It is perfect for many things beyond Fall with the turquoise, reds, polka dots, florals, quilt designs, and stripes in this line.  So cute! 

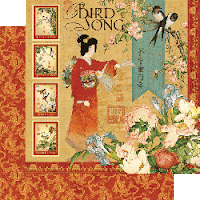
Graphic 45: Birdsong.  For those Graphic 45 lovers, you will love the beautiful prints and patterns within this line.  This Asian inspired line is sure to inspire you.  Think outside the box too. This line has great colors and papers for all types of layouts.

HO, HO, HOLIDAYS WILL BE HERE BEFORE YOU KNOW IT

Simple Stories: Handmade Holiday.  This is the perfect line for a holiday layout, albums, tags, or cards!  There are even 12X12 sheets that have the backgrounds for your fabulous handmade holiday cards already done.  Use the jump start of their backgrounds to add wonderful embellishments and stamped sentiments for the perfect custom made cards.  The colors are traditional, yet mixed with cream colors and Kraft backgrounds.  It is BEAUTIFUL, and like other Simple Stories lines, super whimsical and fun to work with.  

Graphic 45: Nutcracker Sweet.  "Sweet" is the perfect name for this line.  The possibilities are endless, and I found some great projects made with this line for inspiration.  The colors within this line are diverse from the pinks, to the reds, and purples, and greens.  You can have a lot of fun with this line.  It would be another perfect line for your Holiday tags or cards!

With Fall officially starting in a few days, the end of the year will be here before you know it! Don't forget to get ready for the yard sale that is coming soon on Saturday, October 13th.  Also, call Ivy and sign up for the S.H.E.A Scrap Pink October crop on Saturday, October 20th.  It will be a great time to work on your Holiday crafts, gifts, cards, and tags!   So, what is your favorite new line from above?  What might you do with it? What projects do you want to work on this Fall? 

Friday, September 14, 2012

Try Something New!


Try Something New!  I Tried Fabric Ink!!!

If you have not been to the newly remodeled Scrappin' Happily Ever After, you have not seen the fantastic new "Silhouette" wall and display area.  With all the re-arranging, all the Silhouette supplies, tools, and materials are wonderfully displayed in their own area!  You will see it as soon as you walk in the door.  With everything all in one place, it is easy to shop for your Silhouette supplies.

This got me thinking about all the accessories and mediums we can use in our crafting.  Every month at the crop, the number of Silhouette Cameos seems to grow.  With Cameos and Cricuts, we have machines humming and cutting along all day.  Mostly I see people cutting paper items for scrapbook, craft, and card projects.  We all know the machine does more.  I thought it would be good to step outside of my "paper" comfort zone, and make some different kinds of projects.

The Cameo can cut other materials such as vinyl, fabric, magnet paper, tattoo paper, and more.  It can use markers, pens, and pencils to write, sketch, and draw on paper.  With an additional attachment, it can also emboss.  There is heat transfer and fabric paint to embellish fabric and clothes.  Ivy also has some great canvas items such as totes and pillow cases you can embellish in the store as well.  Check out Scrappin' Happily Ever After's wide variety of products that will help you do more with your digital cutter. 
 
At a recent S.H.E.A. crop, I won a fantastic prize - the Silhouette Fabric Ink Starter Kit.  It was just what I needed to jump start my desire to do something other than cut paper with my Cameo!  I thought I would share my first project with you.  

I decided to start with an old tee shirt just in case.  It was a hand me down from the big brother to the little brother, so I thought I would do something to make it a bit "different" for its new owner.

Materials Needed for Fabric Ink Tee Shirt Project:
  • Stencil Vinyl and Transfer Paper
  • Hook Tool for weeding out image
  • Fabric Ink and something to put it in
  • Sponge or Foam Brush to apply paint
  • Iron
  • Paper towels and wet wipes recommended (I am messy!)
  • Cereal box or cardboard if you are doing a project that has a front and back (see below)

Here are some tips before you get the Fabric Ink out:

  • Iron the material before getting started.  This allows the stencil and fabric ink to be applied on a smooth surface, without getting wrinkles, gaps, or bunches.  
  • Measure the surface you will be putting the image on.  Make sure you consider how much "white" space you want around the image on the project.  This will allow you to customize your design exactly how you want it to appear on the project.
  •  If you are doing something that has a front and a back like a tee shirt, make sure you put something in between the two layers so your ink does not bleed through.  I used a cereal box out of the recycling bin.  It worked great.
  
 Here we go! Step by Step...

1. Create the image/words/design you want in Silhouette Studio.

2. Then cut the image out on the Stencil Vinyl.

3. Weed out the image with your hook tool so that you have the mask for the image you want.  You will be taking out all of the "positive" parts of the image.  For example, I wanted the monster on the tee, so I took the monster part of the stencil vinyl out.  This left the "negative" space of the monster which would allow me to ink in the image on the shirt.

  • Tip: Take your time with the weeding.  Make sure you are careful about which items you need to keep, and which items you do not, as well as any interior parts of letters.
  • (Lesson Learned #1 - Don't poke yourself with the weeding tool.  You will then need a band-aid.)

4. Use the Transfer Paper to carefully pull vinyl off the backing paper.  I used the smoothing tool to make sure I got it all.

5. Press Stencil Vinyl onto the fabric.  Again, I used the smoothing tool to make sure the stencil was adhered tightly to the fabric. I did not want any ink to bleed under the edges of the image or words.

6. Use a foam brush or sponge to apply the paint to the fabric.  You can go as light or as solid as you like with the paint.  It is completely up to you and how you want the project to look.

  • (Lesson Learned #2 - Be careful that you do not go over the outside edge of your stencil, or you will have to improvise and put a border around the entire project. Luckily this was a little boy shirt, and the border just helps grunge it up a little.)
  • Leave the stencil in place until the ink has dried completely (Yes, patience is key here, though putting it under a fan helped it dry quite quickly).

7. Once the ink is dry, remove the stencil and use an iron to heat set the ink into the fabric. Once the ink has been set with an iron, it is safe to wash the item. 

So, now that I have done this one project, I have bought several more tee shirts.  I am excited to get some additional colors of fabric ink at S.H.E.A, and get going on another fabric ink project!  I want to try layering two or three colors, or layering fabric ink with heat transfer in my next project.  I encourage you all to give it a try.  If you were going to design a fabric ink project or tee, what would you make and what type of design would you put on it?

Monday, September 10, 2012

S.H.E.A. is OPEN


Scrappin' Happily Ever After officially opened back up this past week.  Woohoo!  There was a great Grand Re-Opening event and sale on Saturday.  Fun was had by many as they checked out the remodeled, repainted, and re-slat walled walls.  Some people stayed for hot dogs, Silhouette demos, and some make and takes, but most of all people shopped, caught up, and there was lots of laughter!  I don't know about you, but I felt like I was going through a bit of withdrawal without my favorite craft store open!    

Here are some pics of the store, post makeover:


It is super cute and has been completely repainted. From the multiple shades of pink, the new display cabinet, the super embellishment bar wall, to the zebra blinged light switch covers, the store has an all new vibe.  If you have not yet had a chance to stop by, make a plan to do so soon. 

Also, don't forget to sign up for the SEPTEMBER CROP.  Fall is here and it is never too soon to start thinking about cards, decor and more with all the Fall events - Back to School, Halloween, Thanksgiving, and the Christmas Holidays. There is still some space available for the crop next weekend on Saturday, September 15th.  Call Ivy today to reserve your spot.  

Now that all the store is unpacked (well mostly), Ivy will be putting out more new product.  Check back here soon for info on new products and upcoming classes!